Outline effect as post process – tutorial
Introduction
In this tutorial I will present a way of creating outline effect for meshes inside UE4. There are two popular methods of creating outline/stroke effect around objects in the game:
- Render mesh twice. Draw first mesh with a standard material and then draw second mesh with slightly higher scale and emissive material.
- Add outline to objects in post-process using edge detection
I’ll focus on the second method, as it requires very little effort to integrate it into existing projects. This tutorial assumes, you are familiar with basics of Unreal Engine 4 and it’s systems (material editor in particular). If you wish to fully understand how to implement edge detection algorithm as UE4 material, some basic image processing knowledge will be useful.
Basic steps
In order to implement outline effect as post process you need to follow these steps:
- Create a post process material that will add stroke effect for objects that have Custom Depth rendering enabled.
- Add your post process material into blendables list in your scenes’ post process volume.
- For each skeletal mesh or static mesh that you wish to be highlighted, enable parameter „Render Custom Depth”.
I’ll explain each of those points later on. If you are here just for the material, you can grab it in download section at bottom of the page.
Custom depth map
One of UE4’s cool features is ability to render individual meshes into separate depth texture and use it in materials. A depth texture keeps information about distance between each individual pixel in world space and a camera. A typical depth map will look like the image below.
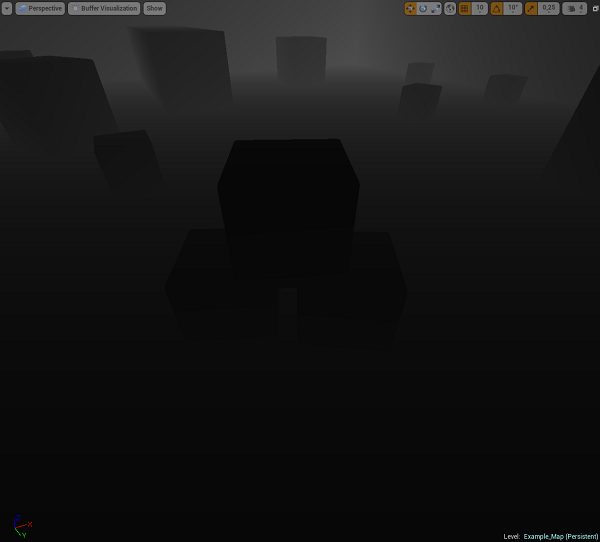
Our custom depth map looks similar, expect there are visible only objects that have „Render Custom Depth” option selected in their properties.

This makes it super convenient to implement effects such us Outline, in screen space.
Creating a material
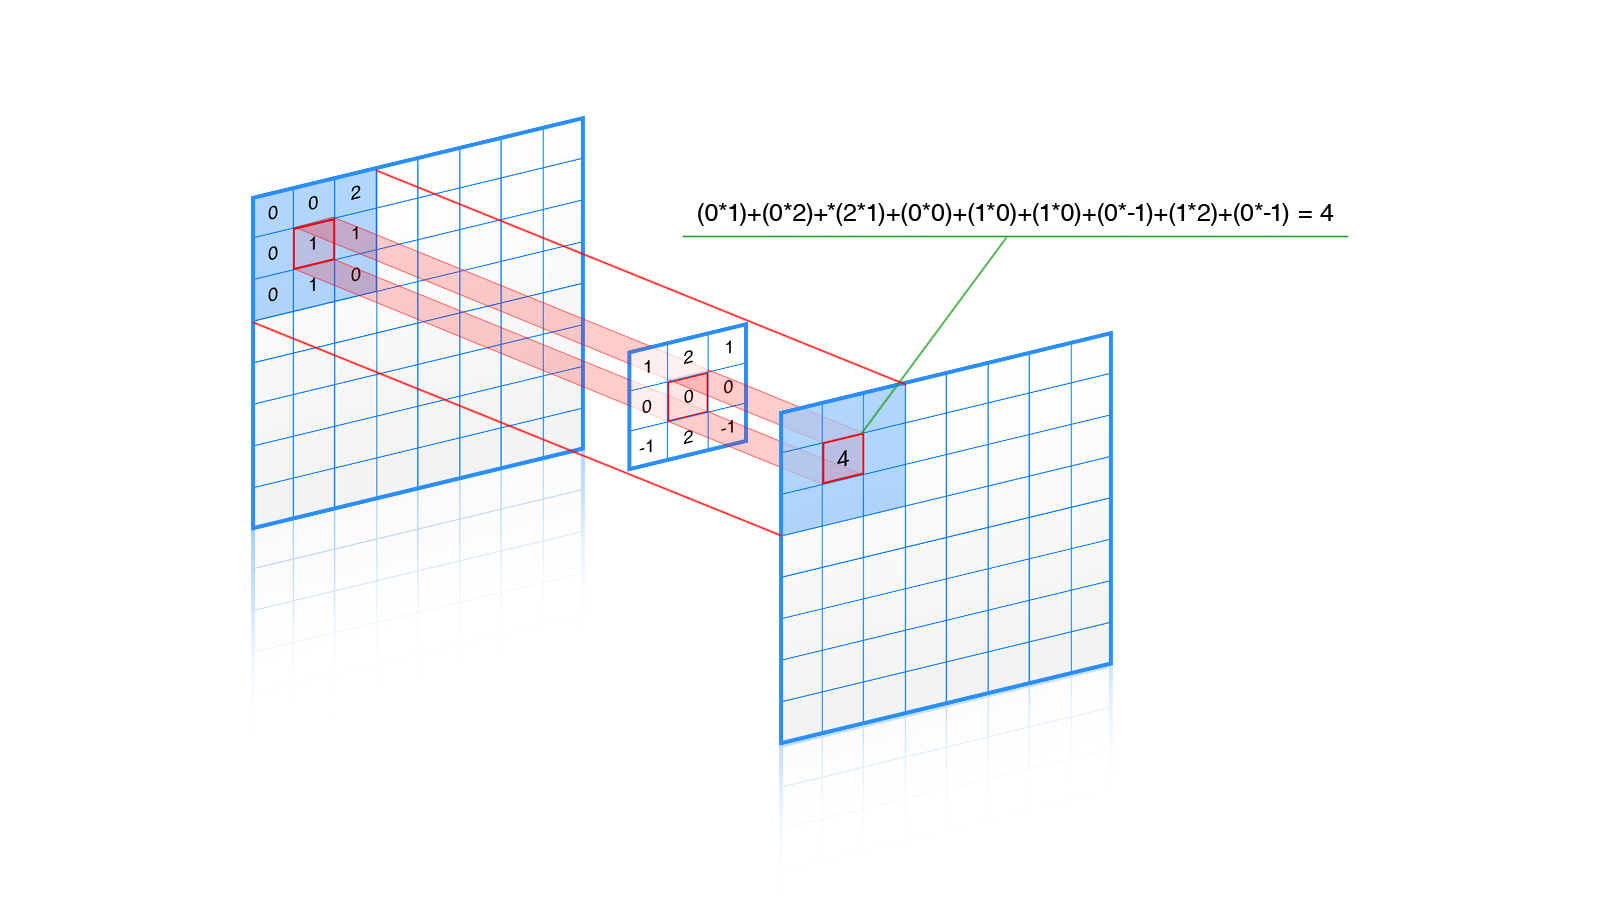
This is the hardest part. In our material we will implement sobel operator and convolve it with the custom depth map. In other words we will apply edge detection filter on our custom depth map to find out where we should draw stroke.
We will start with implementing our convolution algorithm. It’s rather sophisticated math behind this, but everything really boils down to following these steps:
- for each pixel P
- for each pixel PN adjacent to P
- Multiply PN’s value with weight found in kernel’s cell relative to pixel’s origin
- add result to output value
- return output value
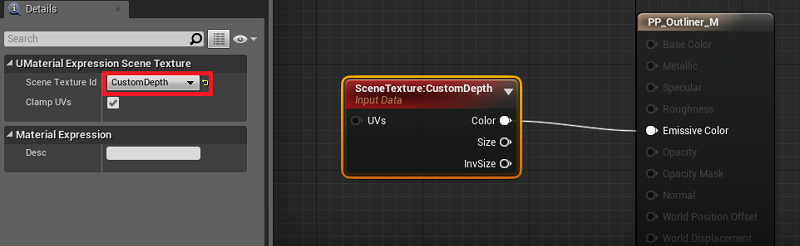
Sampling our depth map is simple: Drop Scene Texture node and connect it to the Emissive output. In node’s properties set Texture ID to CustomDepth
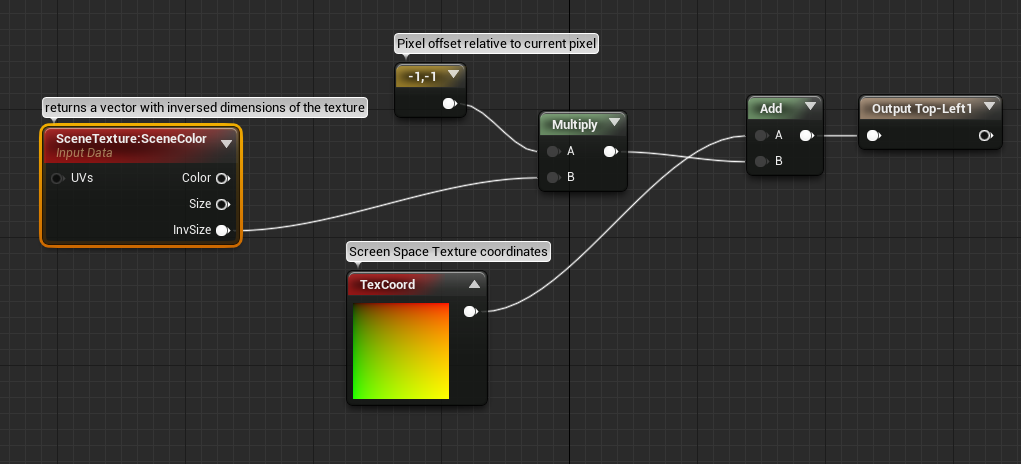
Now, we need to sample adjacent pixels. We can use the UV parameter of Scene Texture node for this. Problem is, UV parameters work in texture space, which means they take values from Top-Left corner(0,0) to Bottom-Right corner(1,1) of the texture. To do this we need to take inverse of our texture width and height, multiply by our offset and add it to UV coordinates of current pixel.
In material editor it will look like this:
Next, we need to duplicate those expressions for remaining seven adjacent pixels. The final setup for calculating pixel offsets:
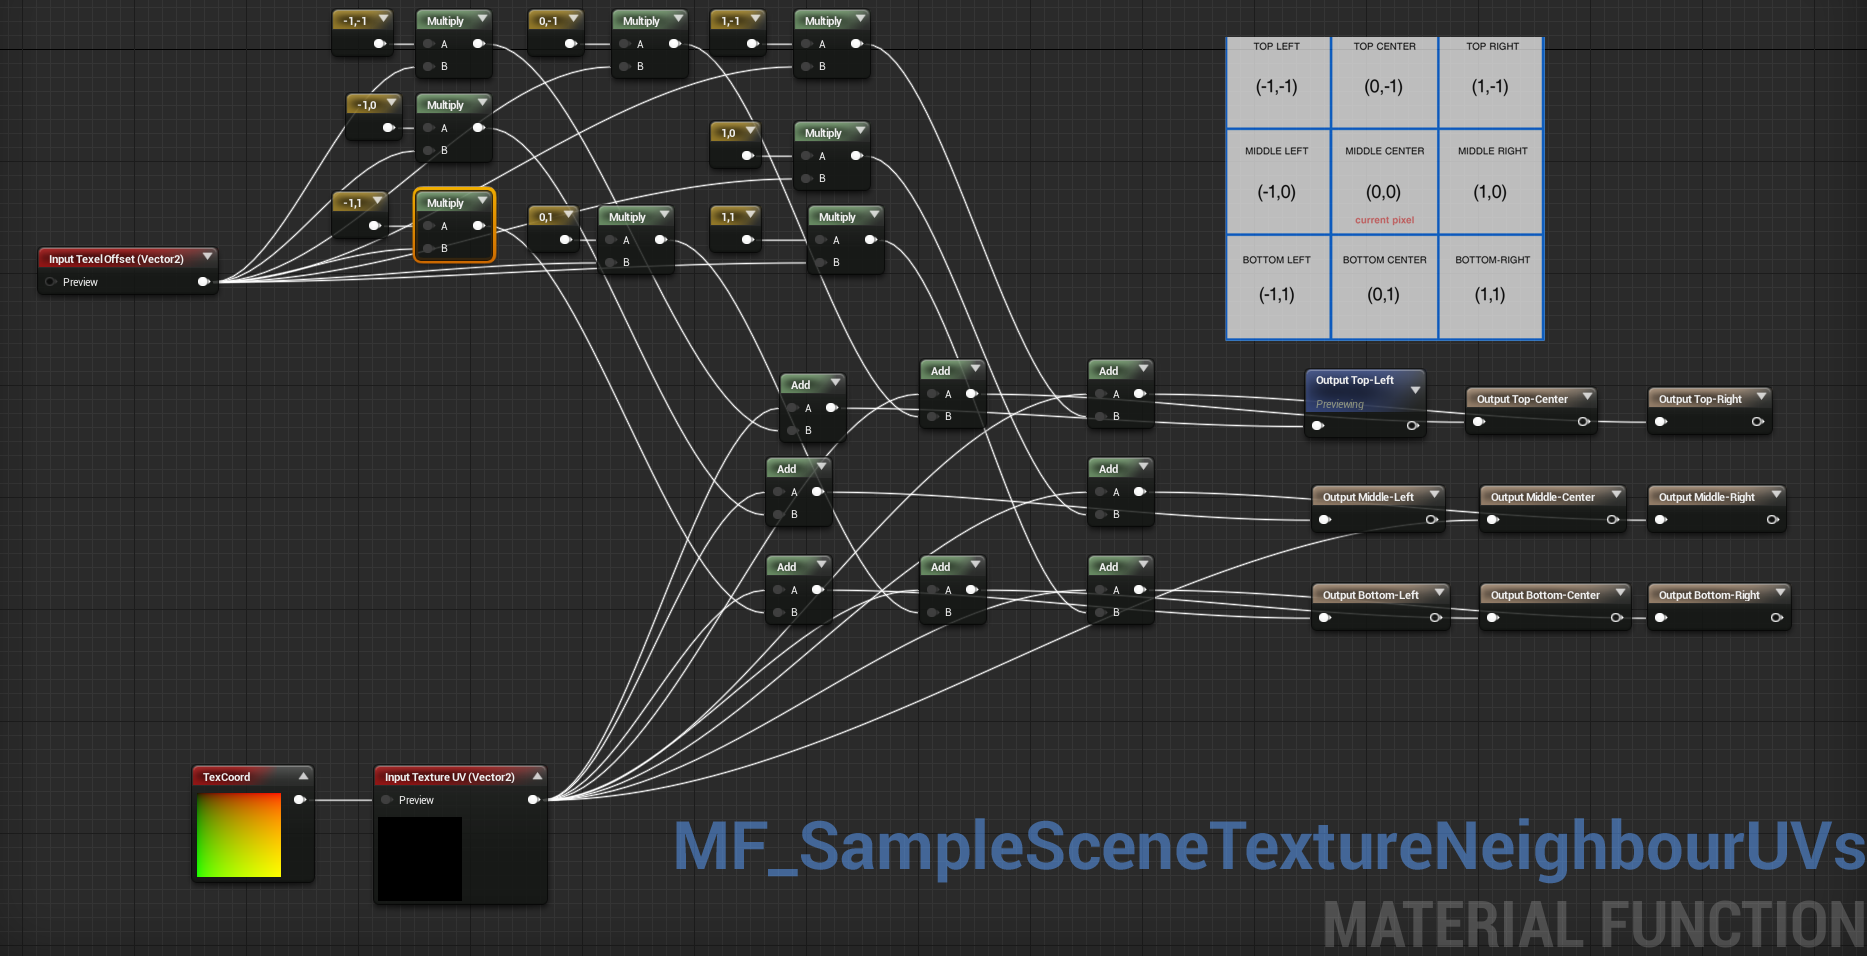
We have a set of UVs for all adjacent pixels, so we can now sample actual values from the CustomDepthMap. I’ve created a simple material function for this. It accepts UV coordinates as input and returns value of the sampled pixel.

If we use this function to sample adjacent values, we will have all the data to do the actual edge detection. Let’s create another material function that will perform the convolution:
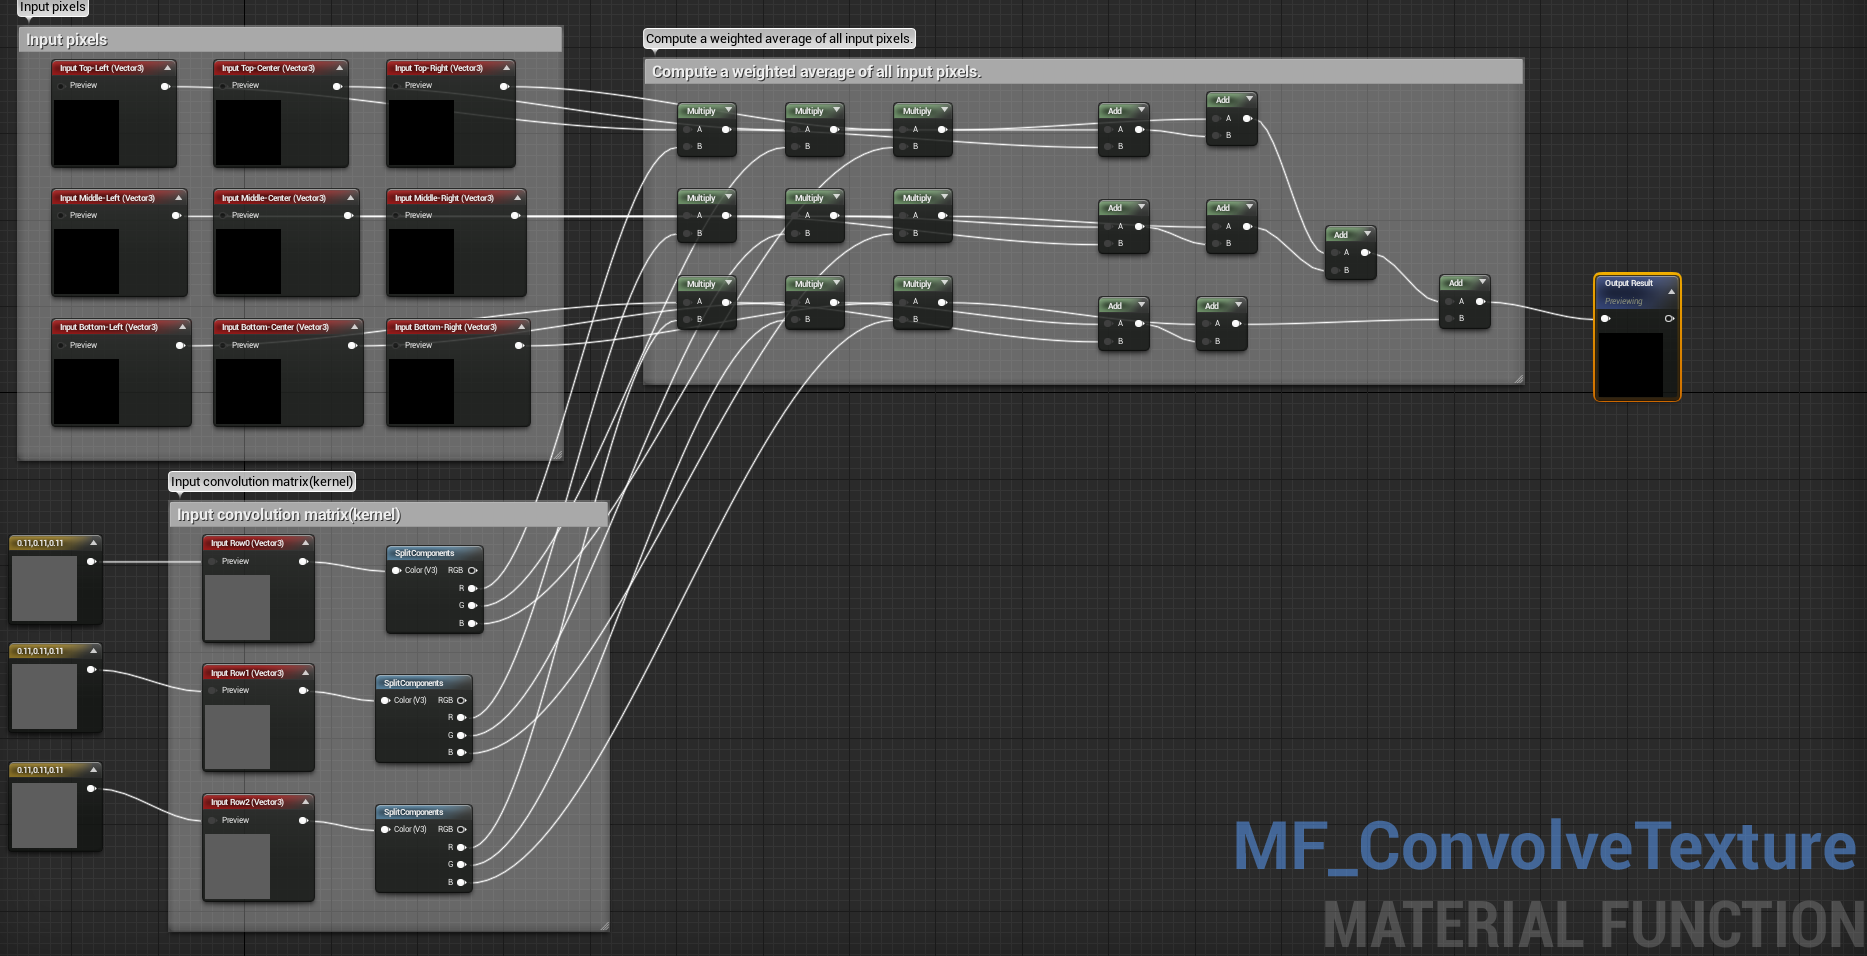
On the left side there are two sets of input parameters. First 9 input vectors are the values of pixels that we will be working on. The other three, provide values of our kernel. It’s really just a 3×3 matrix, but since there is no matrix type in UE4 material editor, I divided mine into three Vector3 parameters. Up to this point, we have all pieces of algorithm. All we have to do is put everything together inside the final material.
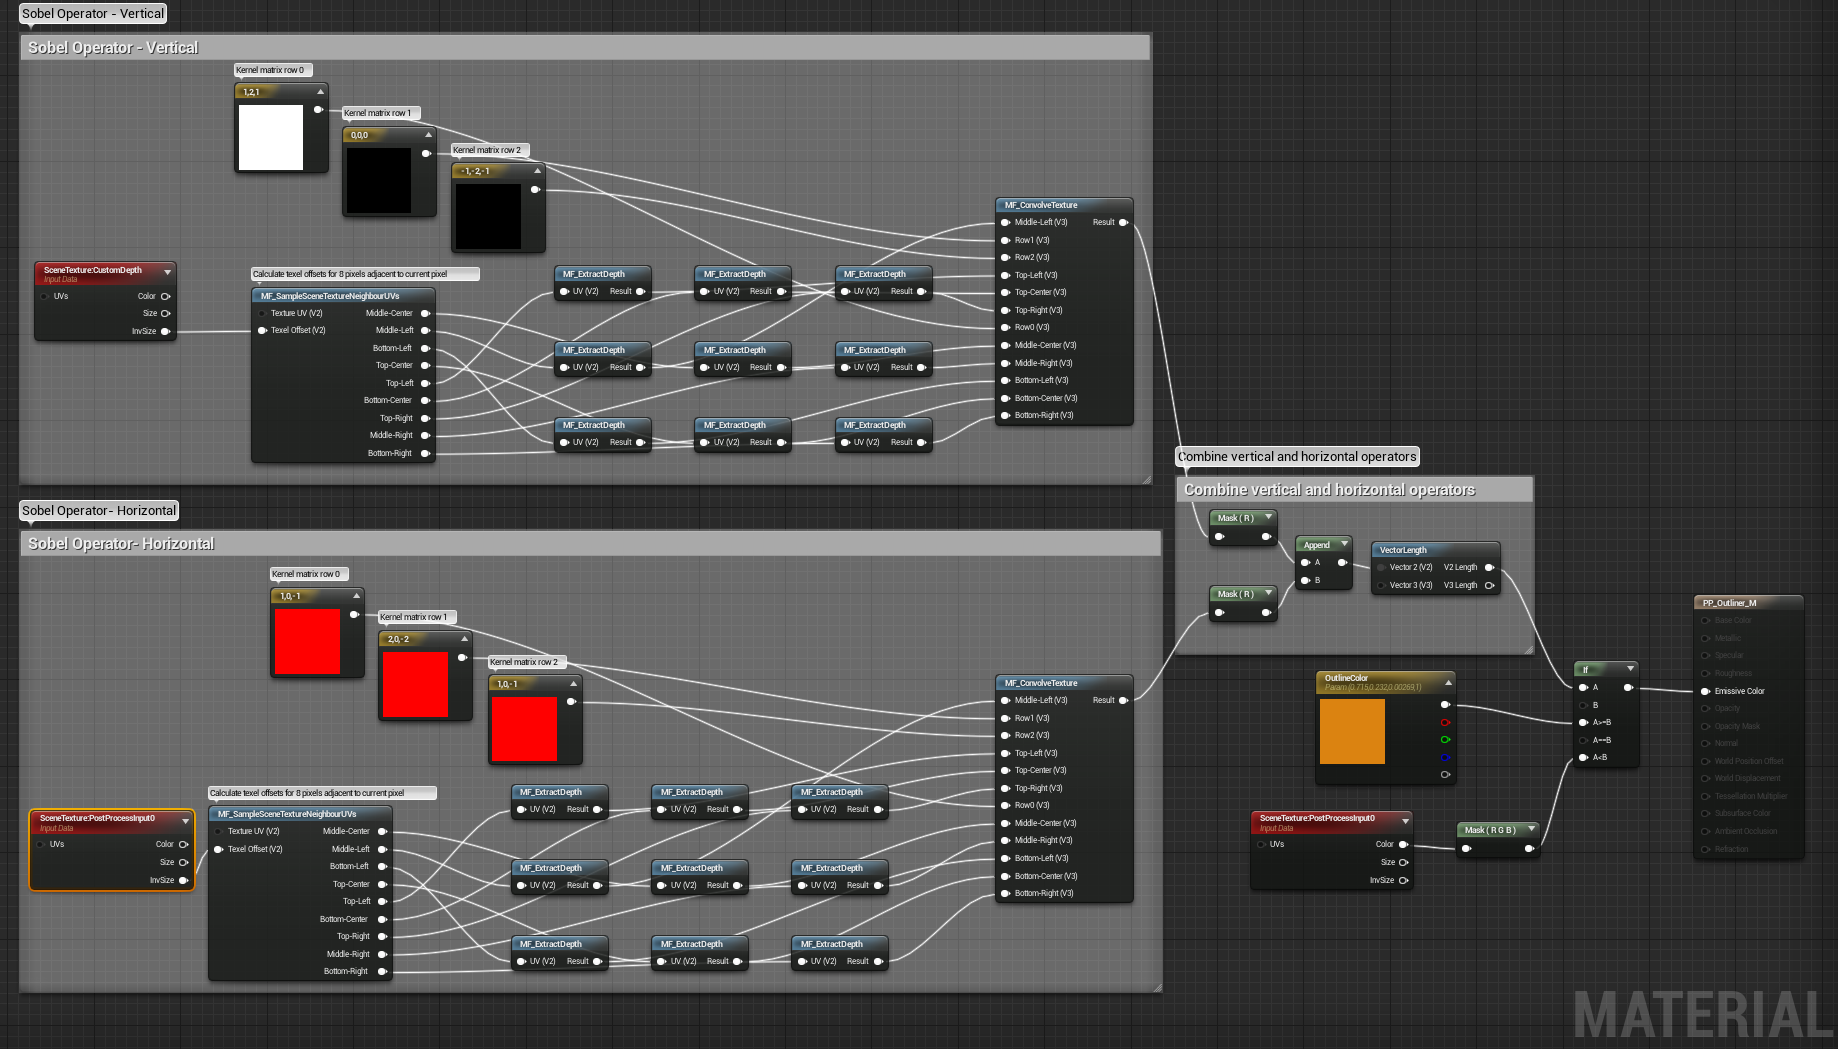
The sobel operator actually involves two convolution operations: vertical and horizontal. As you can probably notice, the only difference between those two is the input kernel.
Now we need to combine our two values:
![]()
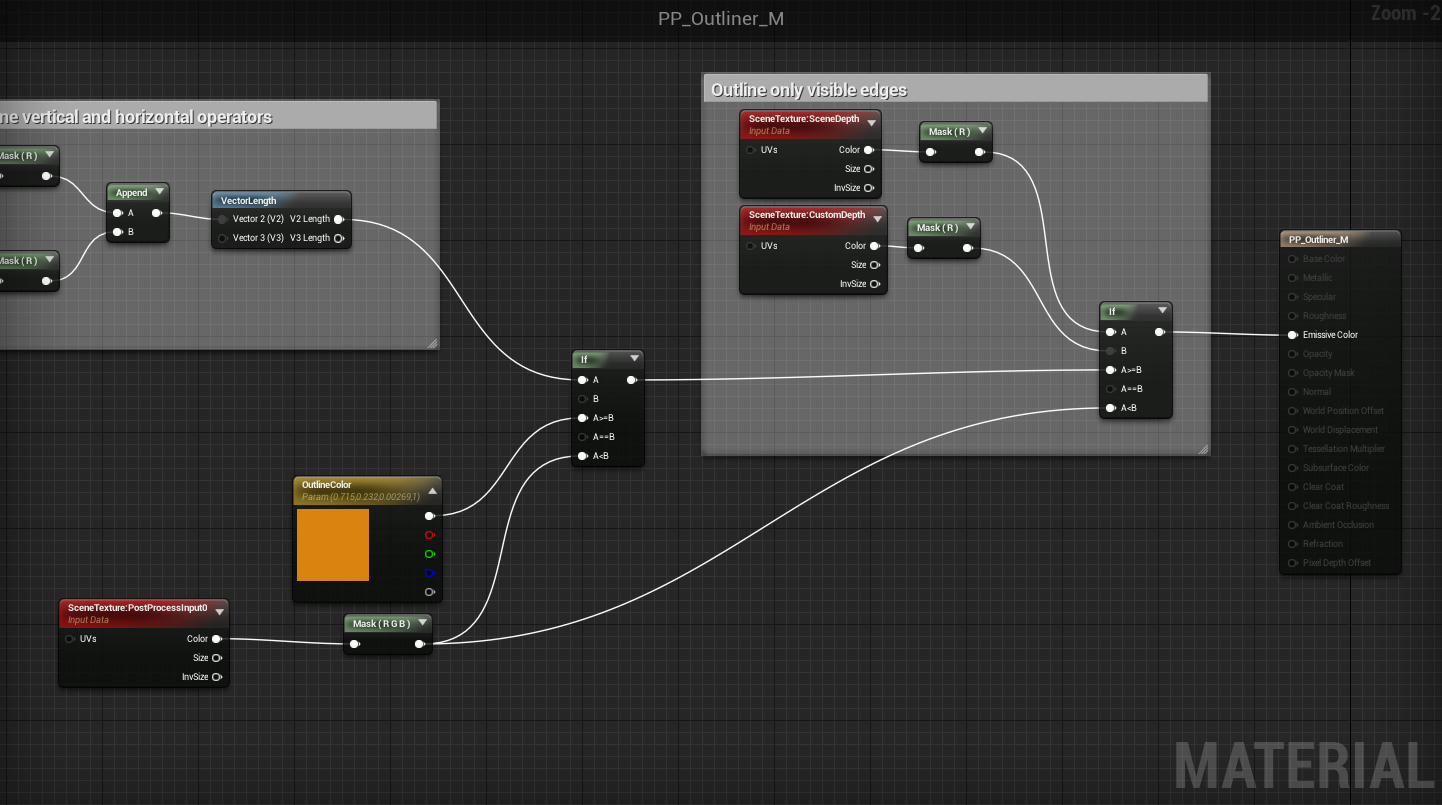
In material editor we can just create vector from calculated values and return it’s length. The output will be black image with white outline around meshes that have custom depth rendering enabled. The last thing to do is blending our outline into final image. In this case I used „IF” expression to get solid stroke around objects, but it should be fairly easy to adjust the effect for your needs.
REMEMBER: Make sure that your material needs to be in Postprocess Domain, and not in Surface. You can change that in your material’s properties.
Scene setup
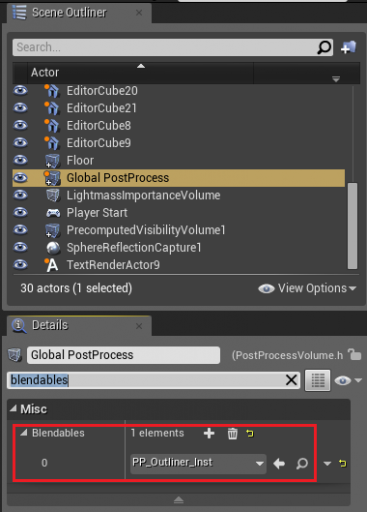
Our awesome material is finished, and now we need to plug it into our scene’s post process to see actual results. In your level select Post Process Volume and search for „Blendables”. Add new item to blendables list and pick your material from the list. If you don’t have any post process volumes in your leve, you should create one. Also double check that your volume has „Unbound” property set to true. Otherwise you will see the outline around objects only when you are inside that volume.
You can test results by dropping any mesh into scene and checking it’s „Render custom depth” property.
Blueprint example
In our sample project, static meshes get highlighted, when player aims at them. I’ve used FPS template for starter. In MyCharacter blueprint I’ve added a new function called Trace. It is called by timer every 0.1 seconds. It checks if player is looking at a static mesh. If yes then it sets RenderCustomDepth to true. When player stops aiming at that mesh, the RenderCustomDepth variable is set to false. You can check it out in action by downloading sample project provided below.
Conclusion
In this tutorial I’ve presented a fairly simple and easy to integrate method of rendering outline around objects. In fact this material is capable of doing much more than this particular effect. By convolving image with different kernels, we can achieve a variety of effects like blur, emboss or sharpen(see http://en.wikipedia.org/wiki/Kernel_(image_processing) for more information).
Demo video
Downloads
Material used in this tutorial.
Hi. Excellent tutorial! Thank you very much – it helped me a loooot! However I’m currently struggling with another thing. I’m trying to get similar effect but only on occluded parts of object. For example – only render outline on the part of cube hidden behind the wall. I’m fighting with this for couple of days now, sadly – without success. I’ve tried many operations between custom depth, pixeldepth and scenedepth, but nothing I’m nowhere closer to solving this. Can you please give me at least some tip on how to create the mask only for occluded parts of object? Will be very very grateful 🙂
This was very helpful man!
Just one Issue, I had to redo part of a material, as some material functions where not ticked to be visible in library, so the material didn’t compile.
Thanks for the tutorial!
Awesome stuff. It works great for me. Thanks for not only putting the material up for download but also for explaining some of how this process works for drawing the outline.
Hello, great tutorial.
Can you help me, I want to make this effect for 3d person player.
How to make it? The problem is in camera.
Hello,
first of all I would like to thank you for the awesome tutorial. I am actually having some issues getting it to work on my project. Once I reach the final step (set Blendables), my screen imminently switch into the colour that my material blueprint (either the main or instance material) is set to. Please advice.
Regards,
Jacquelyn.
Hello Jacquelyn,
Glad you like it. It appears that somehow my material doesn’t properly detect edges in your scenes. Are you experiencing this in all your scenes or just specific ones? Does this happen if you create new blank project? Hard to tell what may be causing this. If you could isolate the issue into test scene and send it over or just provide more info how to reproduce this issue, then maybe I could help.
Cheers!
Hello Albert,
What problem exactly do you have?
The effect should work regardless the camera setup.
Hi!
Apologies for late response. Hope you found solution to your problem.
If not, here’s a little hint that may help you.
You can compute difference of CustomDepth and SceneDepth. That way, you will get values = 0 where object is not occluded, and >0 where it’s occluded. You can try playing with that. Unfortunately, UE4 will not render objects that are fully occluded, so you won’t see the outline(unless these are translucent objects). You can fix that by modifying engine’s rendering code but that’s rather non trivial thing to do.
Thanks for your awesome tutorial.!! I have a problem setting the mat_function MF_EXTRACT DEPTH. It gives the following error :-
Error [SM5] SceneTexture expressions cannot be used in opaque materials
Hey,
Did you set PP_Outliner_M material domain from Surface to PostProcess? I think this might be cause of te error.
Cheers!
great tutorial thanks much
Hi, thanks for this very useful tutorial.
I was just wondering if there was a way to choose which objects are allowed to be „traced”. So far, I noticed that only objects with Collision get traced. I would like to be able to choose objects that can be traced not depending on the fact that they have a collision or not. Maybe create a parameter „can be traced” that we can activate per object? Or a list of objects?
Any idea is appreciated 🙂
Thanks !
I resolved the problem Jacquelyn was having as I too ran into the same issue, after playing around this fixes the problem completely.
http://imgur.com/tmUScqK
Is there any way to use this with the scene depth so that all objects, not just custom depth ones, can have the outline?
Hi there,
Great tutorial! Could you explain exactly how to change the thickness of the outline? So that the effect is quite distinct, thanks 😀
Hi Guys,
Is there anyway I can just highlight certain object? Because right now all static meshes is my scene is highlighted wherever my cursor goes
Hi!
Thanks for tutorial!
I have question similar to one above.
I have custom meshes imported, when I enable render custom depth, they lit up and when I play scene, exact opposite happens.. When I look at them they lit off, when I turn away they lit up. For basic geometry like cubes etc. it works as excepted and I even don’t have to turn on „Render Custom Depth”.
What I am doing wrong? UE 4.8.3
Thanks!
Hey PawelM, thanks for the tutorial. This has been a really good journey on my learning of post-processing and material functions.
I had just 1 problem thou, my edges flicker. I’ve used this calculation on the SceneDepth and realized that the edges are basically all flickering, would you know what could cause that?
SirGouda, this is exactly what you’re looking for…
http://www.tomlooman.com/ue4-outline-post-process/
Thanks a lot. you made my day. Keep it up.
nice tutorial! i’ve been looking this for a long time! i’m trying to read it…..uhh you know i’m a chinese…still, thanks for your sharing of the project!
If you want this to only occur on specific objects all you need to do is create a blueprint interface. Within that blueprint interface create a function called LookAtTrace, than go inside your character blueprint and your object you wish to interact with and add that BP interface. In your character blueprint add an event using your LookAtTrace function that executes the line trace, and finally go into your interact object and add a interface message from your LookAtTrace that enables the custom depth.
Is there a way of making this not occlude through walls? I am using this as an edge shader for characters and it displays the lines through the walls. I tried messing with scenedepth instead of custom depth but it just added the effect to the whole world.
Hello Classyham,
I made a simple modification that does what you are looking for.
Let me know if that works for you.
You can make only a material with contour?
I was looking in this process, but it is a complex medium, do not know how i could do this on my project runner infinity example of the epic – youtube…
Hi great tutorial but what if i want to outline all the edges? thank you for your responce
Hi. Great tutorial. Please advise HOW TO MAKE OUTLINE WIDTH SMALLER (thinner)?
Hi.
I’m using Unreal Engine 4.12.3 and I have tested it your material on it but I can’t use it.
The material function MF_EXTRACT_DEPTH throws the error: Error [SM5] SceneTexture expressions cannot be used in opaque materials.
Do you know how can I fix this error?
Thanks.
I have tried your solution on Unreal Engine 4.12.3 and it doesn’t work. How can I fix this problem on this Unreal version?
Hey Vans,
In the PP_Outliner_M material make sure Material Domain property is set to Post Process and not Surface.
Hey! Thanks a lot, your material is really helpful.
I’m having some trouble, though. In your „Trace” function you have a variable named „current target”. If I create that variable and try to connect it with „Set Render custom depth” the same way as you do Unreal won’t let me.
It says „actor reference is not compatible with Primitive Component Reference”.
This was awesome. Thank you! 🙂
This looks really great! Though, I don’t see any mention of a license for the actual assets you show off at the end. Can I assume you intend to provide them free of charge for commercial use since you’ve provided a tutorial on how to make them in the first place? If so, would you require that I credit you on anything I publish that uses this?
Thanks! Again, really love this effect, so I appreciate you taking the time to teach folks. 😉
I’m glad you liked it! Yes, you’re free to use the files in any project (including commercial). Credit to this website would be appreciated! Thanks
I’m having some trouble unfortunately. I get an error when compiling the PP material saying:
„[SM5] Function NeighbourUVs: Missing function input „Texture UV””
I’ve triple checked both my PP material and the material function for for acquiring UVs of adjacent pixels.
Any help would be thoroughly appreciated!
It’s work for me!!! Thank you very much!
I am using UE 4.13.1
I downloaded Matreal.
PP_OutLiner_M don’t link. So I haved to link again.
I tried a little but succeeded nicely.
Thank you so much for sharing a good idea.
In the material function Sample Scene Texture Neighbor, set Input Texture UV (in the Details) to have „Use Preview Value as Default” ticked
http://i.imgur.com/Jmi87Hj.png
Hej
Super tutorial + projekt i materiał do pobrania. Na razie pobrałem, będę sprawdzać czy działa w 4.17 – powinno.
Dzięki i pozdrawiam, Paweł
Sorry to bother you guys! How can I enable/disable the outline effect through C++, Im a newbie for UE4 programming.
Thanks for the great tutorial!
Thanks for sharing!
Just wanna say thanks 🙂
To anyone reading the comments, this tutorial no longer works for UE4. I’m using v4.18 and many of the material functions being called do not exist in the newest version. It is actually impossible to replicate this the same way. You’ll need to find a different way of making some of these calls.
Thanks
Thanks for your comment. Yeah. This tutorial was created 3 years ago, and a lot of things have changed. I decided to keep it, because general concept stays the same. I’ll reach Pawel_M and we’ll try to update it.
Hi,
Great tutorial. How would I go to change outline thickness ?
Thx
Is there anyway of making the outlines thicker?
Hi Michal,
thank you for sharing this.
Everything works fine, but every time when i start play in engine I get this error massage:
„PIE: Error: Blueprint Runtime Error: Accessed None trying to read property CurrentTarget from function: 'Trace’ from node: Set Render Custom Depth in graph: Trace in object: MyCharacter with description: Accessed None trying to read property CurrentTarget”.
How can I solve it?
Thanks in advance.
Dmytro Lutsak
Is there a way to make the outline only show on specific objects?
I have a pick up blueprint which has a number of static meshes in an array and want only these to be outlined, and not any other static meshes.
I would love to know this too
Hi pawel is there a way to make the outline Thicker?
In material PP_Outliner_M there is SceneTexture:PostProcessInput0 with output parameter InvSize. Multiply it with a constant.
In material PP_Outliner_M there is SceneTexture:PostProcessInput0 with output parameter InvSize. To change outline thickness, multiply it with a constant.
If someone needs to change outline thickness, here is how. Open PP_Outliner_M and find a node SceneTexture:PostProcessInput0 that is connected to MF_SampleSceneTextureNeighbourUVs. Multiply its output parameter InvSize by a constant value to change thickness.
how would i make this animated, like a shockwave/explode effect around the object
how would i make this animated, like a shockwave/explode effect around the object
for example, how would i scale the outline by 2 so there if for example, a 9×9 cube spaced outline instead of a 1×1 cube space outline as each side is scaled by a factor of 2 thus each region is also scaled by 2
eg
_
| |
_
to
________
| |
| |
| |
________
(i suck at ascii art)
Hi Great tutorial, great project.
The project works in 4.21 but when I try to import it into another 4.21 project the MF_ functions do not compile and do not get recognised in the pp_outliner_m.
Any ideas?
I had this problem … you need to add an isValid just before the setrendercustomdepth which is causing the error .. link the valid to the setrendercustomdepth and link the is not valid to the Set just after.
This is basically a null pointer exception that is not caught … it will occure everytime it hits something where it didn’t have a previous currenttarget
Does this work with UE 4.20? I can’t find a lot of the nodes used here.
Yes, it works with 4.20. Make sure you copied „Materials” folder into your project’s Content folder.
Could you do a tutorial video for this?
I put one small one mesh in one big one mesh and both set Custom Depth enable, the small one mesh outline effect will disappear in unreal engine 4.20
I know this is old, but I had the same error and I manage to solve it but not using the default Output node, but a newly added one. Also, as PostProcessing shaders don’t allow you to use SceneColor, the input in the ExtractDepth function should be PostProcessInput0. Here’s how it looks:
https://imgur.com/a/363iXIW
Cheers!
Where do i plug the multiplied value
You can always do a check for specific tags after the raycasting in the blueprints.